Vehicle Repair Tips
Fuel Pressure Regulator Replacement
Rear Hub/ABS Sensor Replacement
Feel free to use these tips, but use at your own risk!
It's not my fault if you break your car worse, or drop your car on your head turning yourself into a vegetable.
Chevy Impala Fuel Pressure Regulator diagnosis and replacement
(GM 3800 Fuel Pressure Regulator)
GM's 3800 engines have a common problem of having fuel pressure regulators fail - even at low mileage. This is a simple problem to diagnose and repair. I documented this process on my 2002 Chevy Impala, to show how it is done.
Diagnose - do I need a new fuel pressure regulator?
If your car is running rough while idling, or dying while idling, or experiencing long cranking times to start
the car - having to crank for 10-15 seconds - you may have a leaky fuel pressure regulator. To find out,
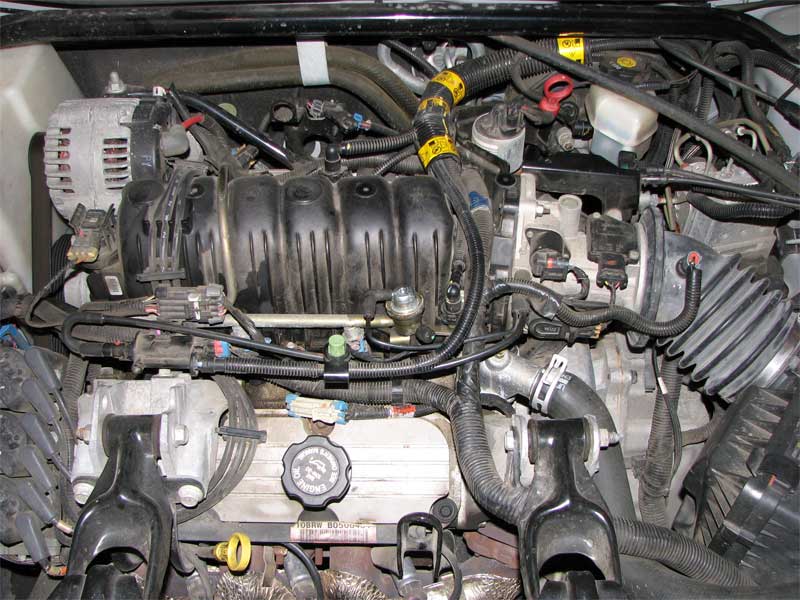
pull the plastic engine cover off.
The fuel pressure regulator is right in the center of this picture.
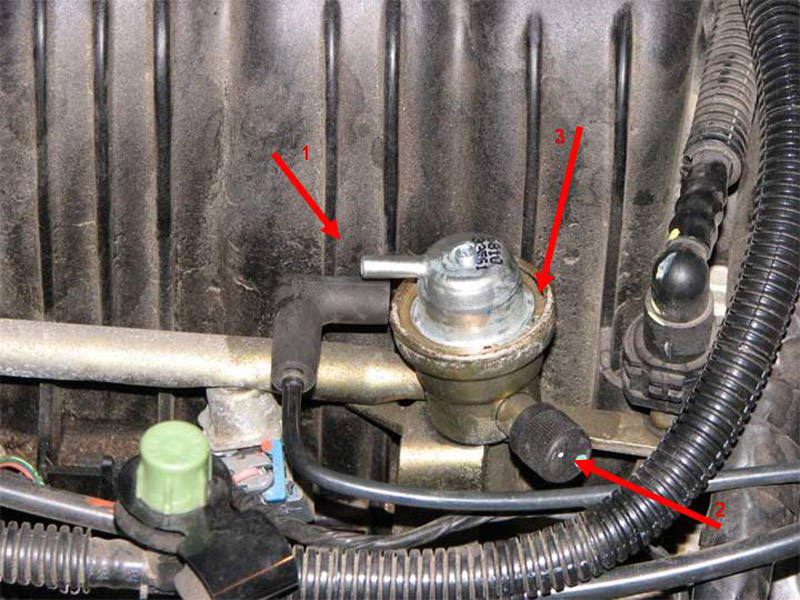
Next, pull off this vacuumhose denoted "1" in the picture below.
See if any fuel comes out of this hose, or the port on the fuel pressure regulator. No fuel should come out.
Try starting the car with the hose off. You will hear lots of air being sucked in the hose -
that's ok (just don't leave it in a pile of dirt, or something, that air goes straight into the engine). Check the
port on the fuel pressure regulator to make sure it stays dry. No fuel should come out of here.
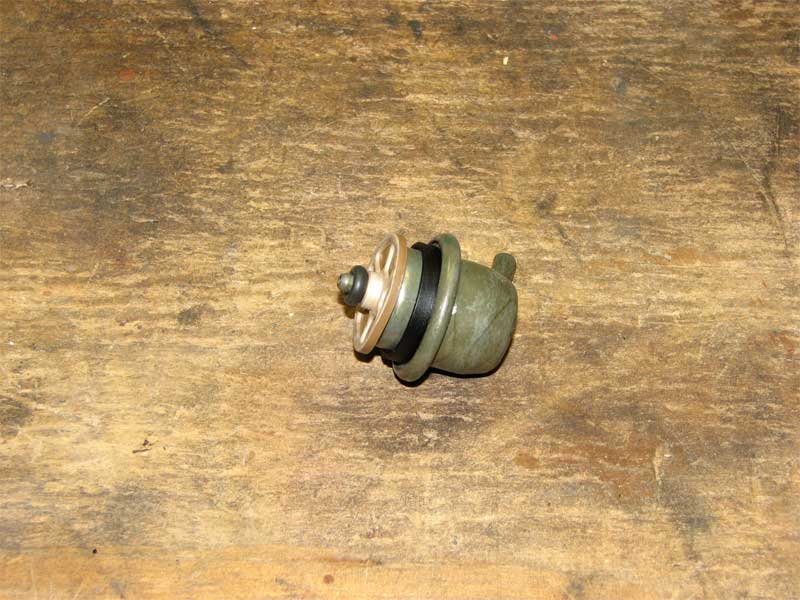
If any fuel comes out, you need a new regulator. A new regulator should cost you about $70 bucks at an
auto parts store.
It will look like this:
Now, you need to remove the old regulator. It would be advisable to do this when the engine is cold, and make sure you are doing this outside, or at least open the garage door. You will have lots of explosive fuel vapors around when you start working.
-
Step 1 - You need to bleed off all of the fuel pressure. Remove the plastic cap that arrow number 2 points
to in the second picture. Under that cap is essentially a tire valve stem. Pressing in on the center
of the valve stem will allow the fuel to come out. It is under pressure, and will spray! Wrap things
up with a rag first, and try to catch the gas somewhere - you will need a lot of rags if you just use rags.
At least a half a cup of fuel is going to come out of here.
-
Step 2 - You will need a pair of snap ring pliers:
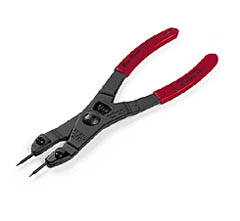
to remove the snap ring that holds in the regulator. Arrow number 3 in picture two points to the snap ring.

-
Step 3 - lift out the old regulator. Make sure that the old screen and o-ring come out with it:
the new one comes with both of these parts - and you don't want to put in two of them.
-
Step 4. Insert the new regulator.
-
Step 5. Re-install the snap ring, hook up the vacuum hose, and put the plastic cap back on the pressure
checking port that you used to bleed the fuel pressure out.
-
Step 6. Turn the key on and off several times - leaving it in the on position for about 5 seconds each time.
This will let the fuel pump push the air out of the system, and build the fuel pressure back up.
-
Step 7. Check for leaks.
-
Step 8. Start the car - might be tough the first time - you still probably have some air in the fuel lines.
Chevy Impala Rear Hub Replacement / ABS Repair
This example was documented on a 2002 Chevy Impala. It is probably applicable to most large cars GM made in the same era - they all used the same hubs and ABS systems.
Most of GM's modern cars which are equipped with ABS have an ABS sensor that is integrated into the hub with the wheel bearing.
Both the hub and sensor are of marginal quality from GM, and tend to fail at low mileage. It could fail for two reasons - either
the bearing itself goes bad - causing vibrations, noise, driveability problems - or the ABS sensor goes bad, triggering your ABS
warning light. When the ABS warning light comes on, this will also disable your ABS, your Traction Control (if you have it) and
your instant mileage readout (if you have it).
I was pretty sure I knew what the problem was on my car - right rear hub intermittently disabling the ABS - but a repair shop
wanted ~$500 to confirm the issue, and replace the hub. I knew that the hub only cost $90. So, I figured I would keep my other
$400 dollars.
Diagnosing a failed ABS Sensor
Now your ABS light can come on for a number of reasons. Your large repair shop will simply plug in their body scan tool, and let
it ask the car why the ABS light is on. In many cases, it will tell them that there is a bad ABS sensor in about 20 seconds, and
then they will charge you $100 for the diagnostic. If you wish to avoid this, you can usually diagnose a bad ABS sensor yourself
with nothing more than a Multi-Meter.
ABS Wheel Speed sensors are basically a variable resistance resistor* - the resistance changes as the wheel speed changes. By
measuring the resistance of the ABS sensor at each of the 4 wheels, it is likely that one of them will have a vastly different
resistence value than the other 3. That is your bad sensor.
* After posting this I got critiqued by a guy from http://www.bbengineer.com/ on
http://www.naioa.com/ who clued me in that they are more complicated than this. It turns out
that the wheel speed sensors are actually Hall Effect sensors which
generate an AC current when the wheel turns. You may not be able to pick out the bad sensor just by checking the resistance alone
- he suggests that you also set the multimeter to read AC voltage and spin the hub. You should get a clean steady voltage reading
- I checked my _bad_ hub after the fact, and I got around .1 volt at about 2 revolutions per second. My multi-meter really wasn't
accurate enough to be testing that low of voltage however, and I was testing my bad hub. So I'm not sure what the voltage
should be for a good sensor. Again, just compare all of your sensors. 1 is likely different from the others.
Now, of course, there are a huge number of other reasons why your ABS light could be on. You could have a damaged wiring harness
leading to a Wheel Speed sensor. This is fairly easy to check for as well - when you get under the car to check the Wheel Speed
sensors, you should also check the conditions of the wires leading to them. If you find a damaged/broken/corroded wire or connection -
that is probably your problem. Or, you could have a failed ABS pump, or computer module which controls the whole thing, in which
case, open up your wallet and find a repair shop.
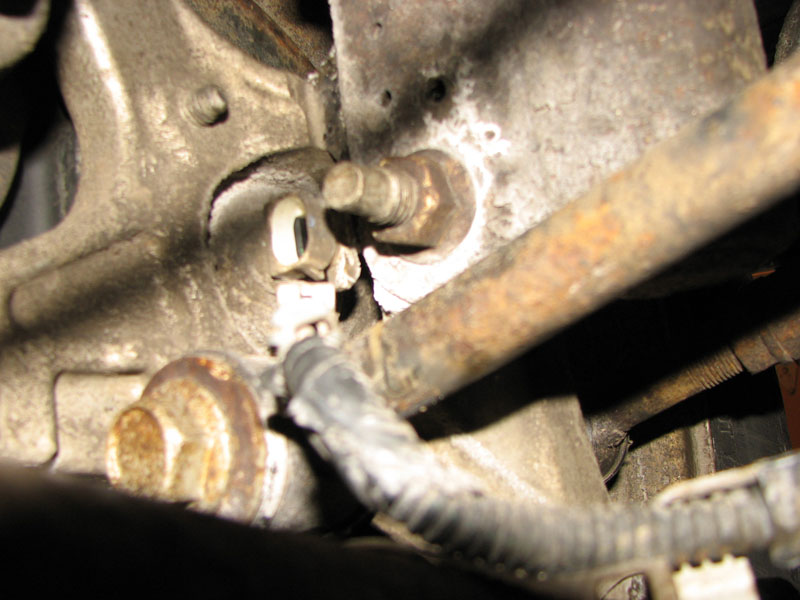
Start by getting under the car, and checking out the condition of the wires going to the Wheel Speed Sensors. Make sure they are
all hooked up, and don't show any signs of damage. You might pull out each plug, and check for corrosion. Here is a picture of
the right rear wheel speed sensor on my Impala, with the sensor unhooked from the wire.
Next, you want to check the resistance of each sensor. It is possible to do this without removing the wheels, although, in retrospect,
it would be much easier to remove the wheels (at least on the front). On the rear, at least on my car, I found that it is much easier
to check the resistance of the sensors on the harness, where it plugs into the underside of the trunk.
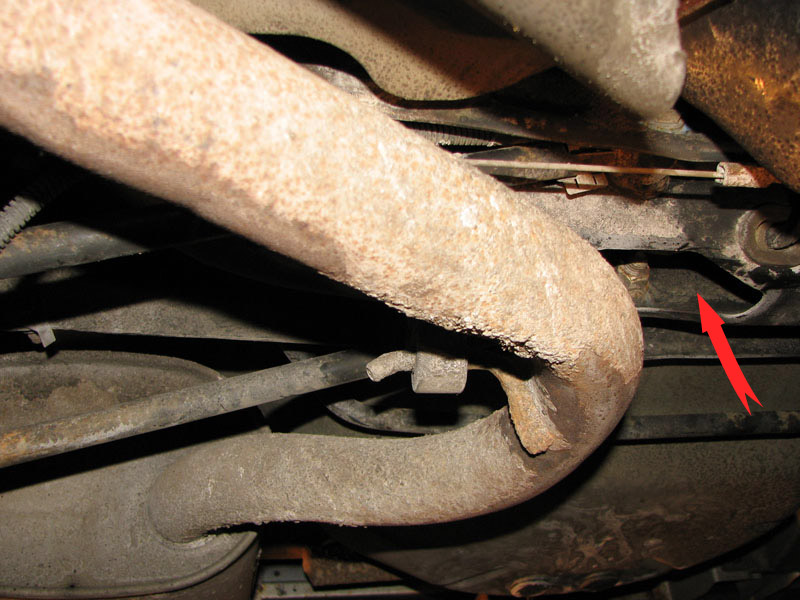
If you trace the rear wires, you will find that the right and left combine into a single harness, which then goes up here:
Now, looking directly up into the cross member, you can see where the ABS harness plugs into the car body. To be clear - this picture
is taken looking up, directly inbetween the rear wheels, slightly off-center toward the right side of the car. Unplug this cord, and
bring it down where you can get at it. Two of the wires go to the left wheel speed sensor, and the other two wires go to the right
wheel speed sensor. Compare the color of the wires to the color that you see at the sensor to figure out which is which. Check
the resistance across the left two wires, and across the right two wires.
Compare these values to the values you get from the front wheel speed sensors - I didn't find any convenient place to check these,
so I checked them right at the hub. It almost requires three hands, but it can be done without removing the wheels.
The values that I got on my 2002 Chevy Impala were between about 1010 and 1040 Ohms, with the wheel not moving. Except, of course,
for the right rear - the one I'm replacing, which showed about 1500 Ohms, except for sometimes, when I turned the wheel a bit, it
would shoot up over 2000, then down to 800, etc. It was very sporadic - Bingo. The source of my ABS light.
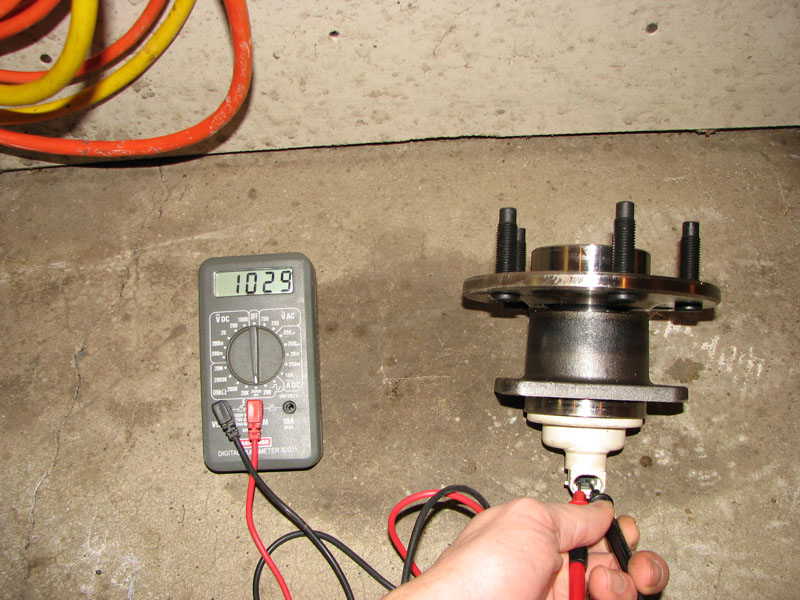
You now need to go pick yourself up a new rear hub. As you can see, the new hub has a resistance of 1029 Ohms.
This one cost me about $90.
This would be a good time to just take the new hub, and plug it into the ABS harness in place of the one that you think is bad,
and start the car. See if your ABS light goes out. It should.
If not, you may have other issues...
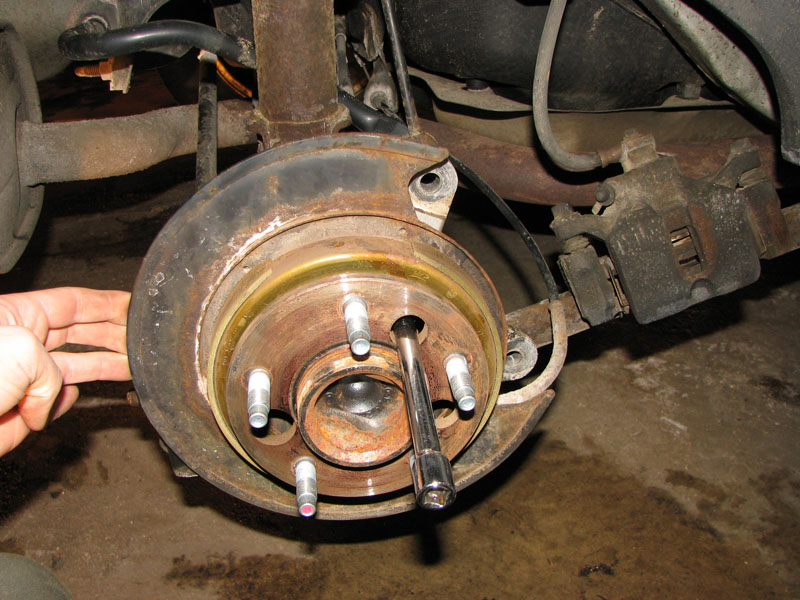
Remove the wheel, brake caliper, and brake disk. Support the brake caliper somewhere where it won't be damaged, or pull on the hose.
Now your ready to remove the bolts that attach the hub. There are four of them - you access them using these
nice big access holes.
Now, the really fun part. In theory, the hub should just pull off at this point. However, it's very likely that your hub is
really rusted on. It sits tight within a housing, and has to be pulled off. At first, I thought, no problem. I'll just put the wheel
back on, run the lug nuts back on, and use the wheel for leverage. Pull, push, wiggle. Nothing. This sucker wasn't moving.
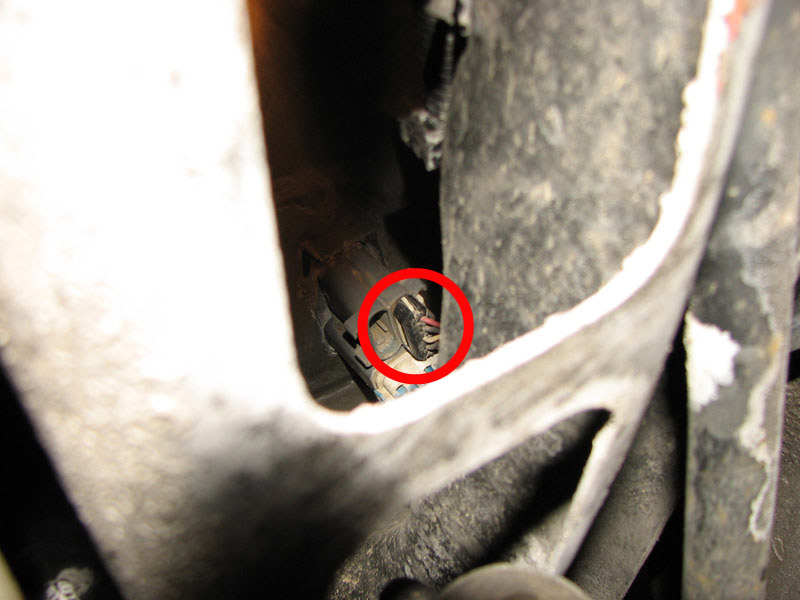
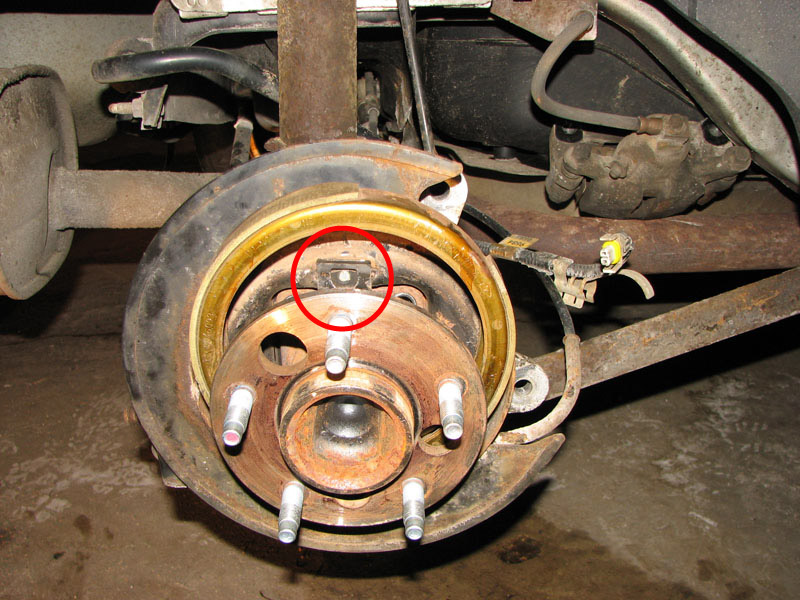
I ended up pulling the parking disk brake shoes up out of the way (they are just held on by spring tension) to give my self some
room. Note the clip in the red circle. When you reinstall everything, make sure the parking brake shoes are back inside of this clip.
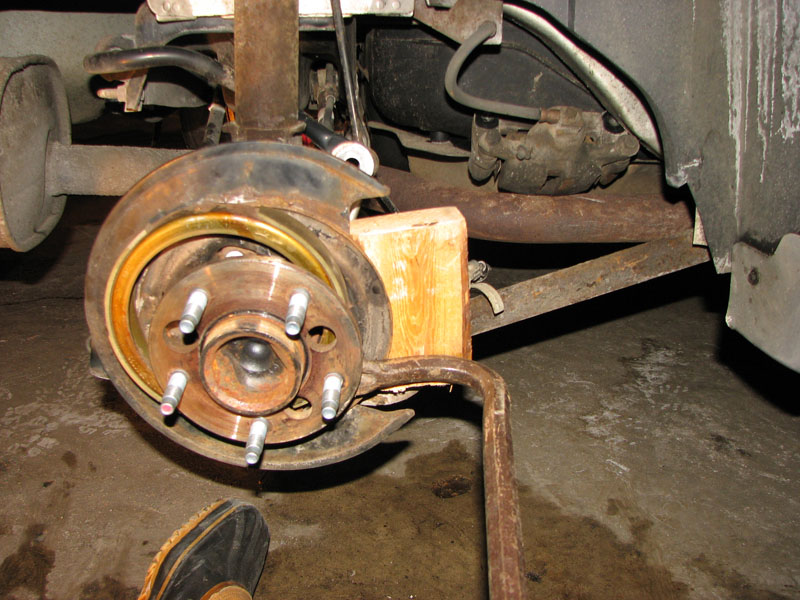
I couldn't figure out any way to attach a proper puller to the hub, and I couldn't generate enough brute force with my hands to get it off.
If GM hired engineers that ever had to work on something they designed, they would have left a couple of holes on the backside of the hub where you could hit it with a hammer and punch, or,
thread some bolts in to push it out. But no. I'm sure they have a $300 dollar tool that they sell to the shops to pull the hubs off.
Of course, I didn't have that tool. Nor did I have easy access to a welder to fabricate something. So I just ended up going old school. More leverage. Big Bar. Block of wood.
By placing the bar at various points behind the hub, I was finally able to work it out.
It gets easier from here.
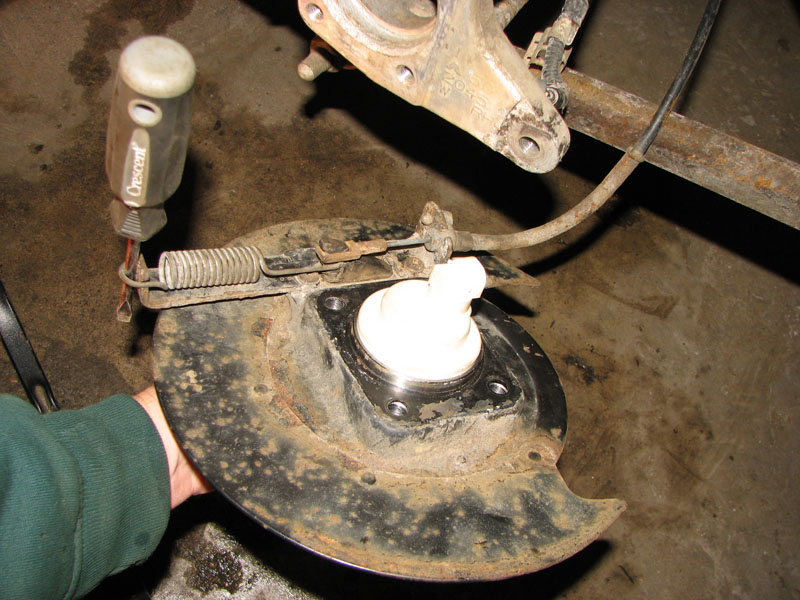
Unhook the parking brake cable. Remove the spring first, then the cable is easy to remove.
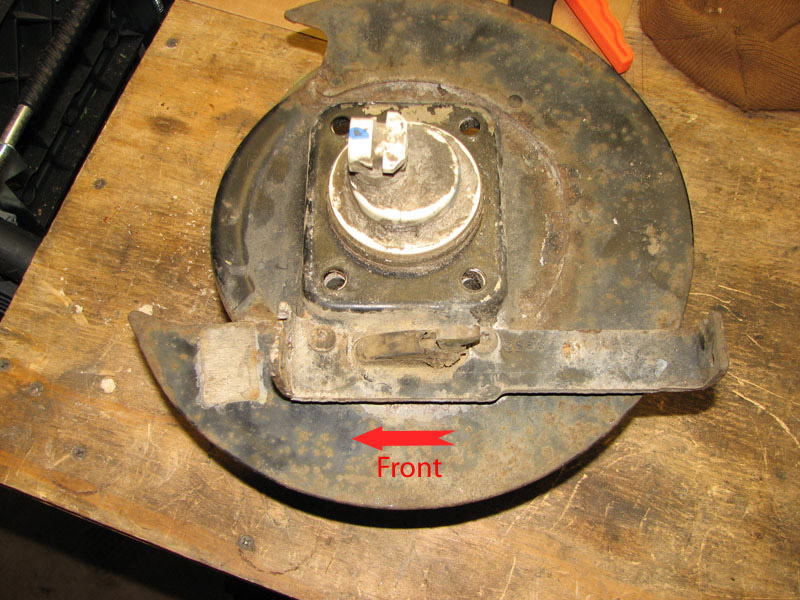
Need to remove these two screws to get the hub out of the backing plate. Arrow points toward the front of the car.
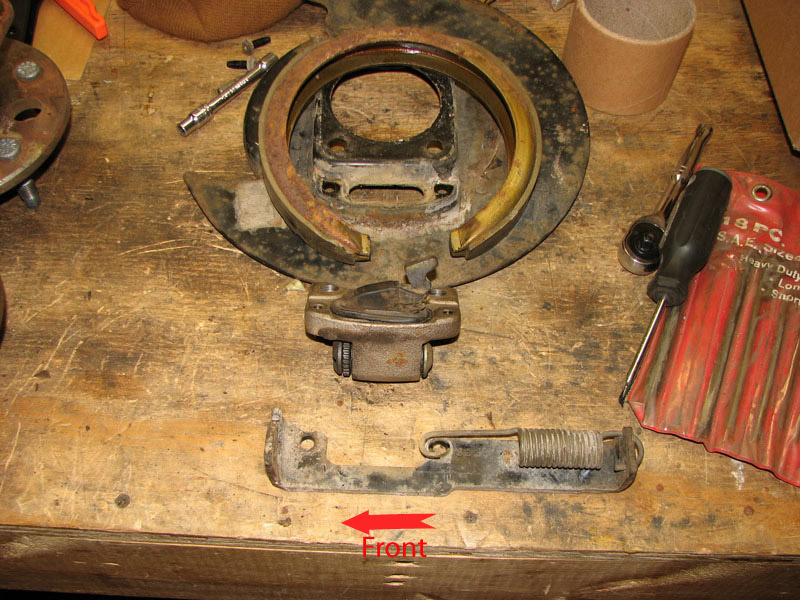
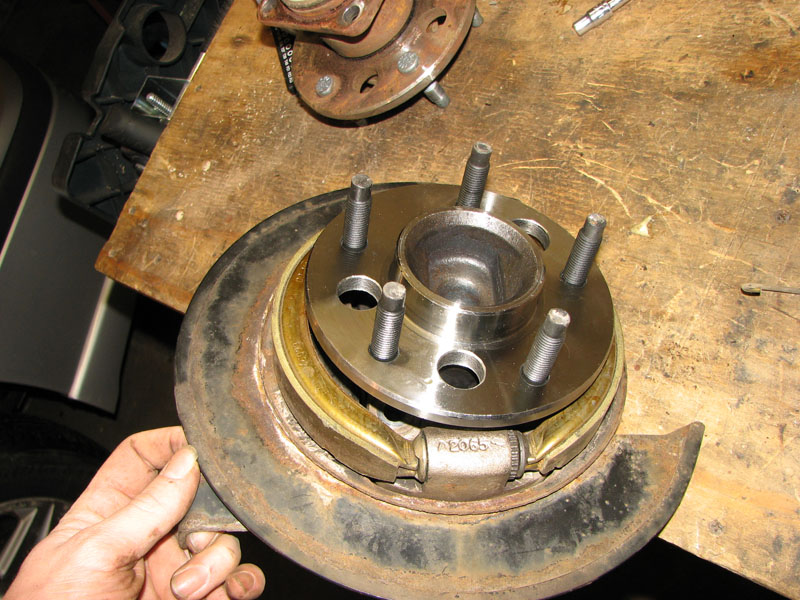
Finally. Lots and Lots of pieces.
This picture is to aid in reassembly, and the arror points toward the front of the car...
Put in the new hub, and reassemble all of the pieces of the parking brake and the backing plate.
Clean up the the area where the hub goes, so you don't have to fight it on the way in.
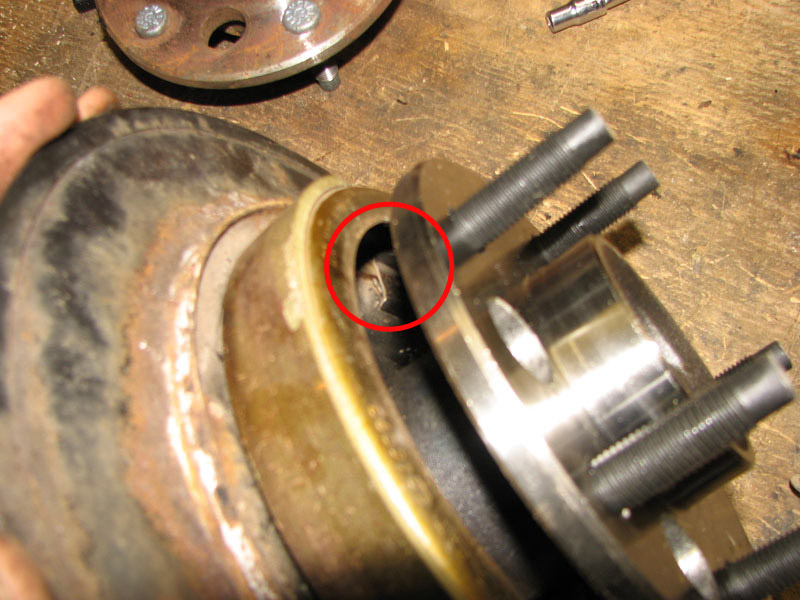
Remember that clip I mentioned before? Make sure that it is properly holding the parking brake shoe.
Make sure the parking brake shoe is properly seated.
Now, all you have to to is reinstall everything. Hook the parking brake cable back up.
Push the hub assembly into place. Reinstall the bolts and tighten.
Reinstall the brake disk and brake caliper.
Reinstall the wheel.
Remember to step on the brake a few times before you take it out of park... gotta get the pads pushed back into place around the rotor.